
Top 10 tips to make your R package even more awesome

What this post is about
This post shares top ten tips on how to make your R package even more awesome than it already is. As an R developer, you’ve already put a lot of work into creating and testing your package - so why waste this opportunity to really showcase your work and make it go even further? The tips mentioned in this post can be divided into three main categories:
-
Communicating your package: so others can access your package and try it more easily
-
Wrestling time back from developer chores: so you can spend more time on the important things
-
DevOps best practices: so other fellow R users will feel more confident about using your package, and make it easier for other developers to collaborate or contribute.
This post assumes that you’ve already written an R package, and therefore won’t focus on the coding component of R package development.
Background
Before we begin, shameless plug alert: I’ve written a few tiny R packages. Here are a few of them:
-
rwa: you can run Relative Weights Analysis (a.k.a. Key Drivers Analysis) to measure variable importance. This is available on CRAN.
-
hkdatasets: contains datasets that relate to Hong Kong, and is used for our own projects at Hong Kong Districts Info. This is also available on CRAN.
-
parallaxr: allows you to generate pretty parallax scroll documents with R and Markdown.
-
surveytoolbox: this package contains all the ‘convenience’ functions back in the days when I was analysing mostly survey data.
-
hkdistrictballs: created for fun, that allows you to generate “country ball” graphics but for the 18 districts of Hong Kong. Makes use of the magick package.
Admittedly, I did not write all these R packages for entirely altruistic reasons. Writing an R package is an exercise that is valuable in itself, as it allows you to put all your most commonly used custom functions into a neat, self-contained package which you can just load at the start of your analysis sessions, instead of copying and pasting snippets of code from GitHub Gists or randomly placed R scripts.
I used to keep a GitHub Gist which contained 1000+ lines of my most used functions, but trust me, you won’t want to do that. Not only does such a maniacal workflow make the likelihood of your future self being able to reproduce your work completely dependent on your organisational or documentation skills, it also represents a potential loss to your colleagues or the R community, as all the work that you have put into writing your custom functions will help nobody else but yourself, as nobody else can access or understand your functions.
However, one big reason why I write all these R packages is because I enjoy the creative process. I believe a significant, but sometimes neglected, part of writing R packages is communicating to your package users on why they should use your package, and how they can use them. Easy to follow examples, reproducible vignettes, documentation that isn’t 100% technical-lingo - all these things help with making an R package easier to use, yet are unrelated with the quality or the implementation of the R code itself. A lot of this is about communication, which is mostly what this post is about (for the code quality aspect, I would recommend resources like Advanced R or R Packages instead).
So here are my top ten recommendations on how to make your R package even more awesome than it currently is. Let’s go!
1. Create a package website with pkgdown
Whilst this tip is quite well-known, it’s place in the top ten is unquestionable. The pkgdown package makes it incredibly easy to create a package website straight from the files that ‘naturally’ exist in your package, such as README.md and DESCRIPTION. This package website will document all the functions in your package, running even all your examples in R scripts (under @examples), and make it incredibly easy for your users to navigate your package and try out its functionalities.
The alternative is to make your users go through the official PDF R package manual - which although is easy enough to generate with devtools::build_manual() - is not the easiest to navigate, does not natively support plot examples, and definitely more likely to put off new R users from using your package.
For an example of the website in action, here is an R package that I’ve recently written for work, which leverages pkgdown to showcase the large number of functions in the package, and to include an “Analyst Guide” to make it easier to explore the package’s features.
The set-up I would recommend is to set up a GitHub Actions that generates the pkgdown website to a separate gh-pages branch every time you push a commit to the main or master branch on GitHub, and set your GitHub Pages to point to gh-pages for hosting.
What this effectively means is that you will a package website that practically “maintains itself”, as the website will update itself as you update your package (like DESCRIPTION or the function documentation) and push the changes onto GitHub. What’s more, this set up is free as it’s hosted on GitHub!
To set all this up, you just need to run:
usethis::use_github_actions("pkgdown")
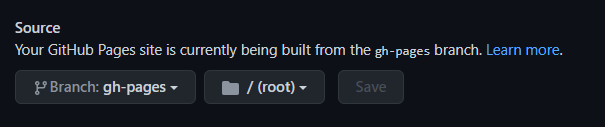
This line of code will configure a GitHub Actions workflow to build and deploy your pkgdown site whenever you push changes to GitHub. This should be created and saved at .github/workflows/pkgdown.yaml. The only manual step you’ll need to do is to go to Settings in your GitHub repo, go to Options, and scroll down until you see GitHub Pages. For Source, the page site should be set to being built from the root folder of the gh-pages.
Once this is set-up and saved, it should just take a few minutes and you should be able to see your website at https://<YOUR-GITHUB-USERNAME>.github.io/<YOUR-PACKAGE-NAME>. You can also of course use a custom domain if you wish.
If you’d like to customise your website, you may add a _pkgdown.yml file which you can specify things like what to show your navigation bar, Google Analytics tracking code, site theme, social network icons, etc. There are plenty of package sites that are set up this way, so if you’re looking for inspiration you can just take a peek at the _pkgdown.yml file for any pkgdown sites that use this set-up (you can start with the actual pkgdown pkgdown site). The five R packages mentioned at the beginning of this post also uses this set-up.
2. Automated R CMD checks with GitHub Actions
Chances are, if you’ve already written a package, you’ll at least have run a R CMD check, or ran devtools::check() to test for errors in your R package.1 The R CMD check automatically checks your code for common problems, e.g.:
- whether the package can be successfully installed on different operating systems
- whether there are syntax errors in the script
- whether there are undocumented arguments in your functions, etc.
Now, you can either run this manually on your local machine, OR, you can configure GitHub Actions to run this check automatically whenever push a commit or merge a change to your main/master branch. The bonus with the latter, of course, is that you get a nice fancy badge that you can place in your README.md, like this:

The only thing you have to make sure is that your package passes these checks before you add the badge for the first time, otherwise you’ll get an alarming failing badge on your repo!
The easiest way to add GitHub Actions, again, is to use the usethis package:
usethis::use_github_actions()
Similar to tip #1, this adds a yaml file under .github/workflows called R-CMD-check.yaml. To add a badge, you can then run:
usethis::use_github_actions_badge()
You can check the usethis documentation on the specific details of this function.
Adding automated checks embodies the principles of CI/CD (continuous integration, continuous delivery) coding practice, which prefers regular and frequent code check-ins to version control repositories. Automated checks is a form of continuous testing, which is a condition for CI/CD. As an outcome, the argument goes that this leads to better collaboration due to greater transparency, and higher software quality due to continuous testing. Errors can be identified sooner, plus a ‘passing’ badge helps assure potential users of your package that you have done your homework to make sure that your package is passing all the basic checks.
3. CodeFactor
Speaking of badges, here’s another that you can add to your GitHub!

CodeFactor performs an automated review of your R code for code quality, and returns a grade (just like in school!). As you’ll see, it’s possible to get an A+, but you can also get a few of the following grades:


Instead of checking whether your functions fail or whether your package can be successfully installed, CodeFactor checks for things like:
- Whether you use
library()within a function - which is not recommended - Whether you have arguments which have been defined but never used in function
- Whether you adopt sub-ideal practices like
1:100(instead ofseq_along()) orsapply()(due to return type uncertainty. ) - Using
options()directly inside a function instead ofwithr::with_options()
This is a great way to review your code automatically, instead of badgering a friend who happens to be an experienced R developer to review your package for you.

And speaking of badgers, I highly recommend checking out the badger package, which allows you to generate badges in your README. There are so many other badges that you can add to your package README (e.g. code coverage, number of downloads), but I won’t detail them here as this would turn into a post about badges.
4. Use conventional commits
Write every commit message as if it's part of a PR to your future employer.
— 🐢 Florian (@fistful_of_bass) December 15, 2020
- Confucius
There are many reasons for making sure your commit messages are sensible rather than unhelpful and silly (e.g. “update repo lol”), including the one cited above. Here, the recommendation is to actually take this further and use conventional commits. What this refers to is the adherence to a set of conventions when writing commit messages by expressing intent. Each commit message would be prefixed with, for instance, fix: or feat: to indicate whether it is a bug fix or a feature change. Some examples are:
feat: add new barplot function- a new feature introducedfix: syntax error- a bug fixformat: ggplot theme changes- a change to formatting that doesn’t affect code logicperf: remove nested loop- a change to performance by removing nested loopsdocs: add examples- a change to the documentation only
You can find out more about conventional commits here. I highly recommend at least reading through the FAQ section, which answers some common questions which pop up when you are coming across conventional commits for the first time.
The benefit of using conventional commits is that it increases the transparency of the entire project, and makes it more welcoming and inclusive for collaborators. I’m also sure it will impress potential future employers, with its incredible neatness! It will also make things much easier when you are writing up pull request summaries and any package change logs.
To make this even more inclusive for other collaborators, you can add a Git Style Guide to the Wiki page of your GitHub repository, like this. Kudos to Avision Ho for sharing this idea and concept with me in the first place.
5. Package start-up message
This is probably the most controversial tip in this post, i.e. adding a start-up message to your package. This is a short snippet of message that you can write to your package users which will come up whenever they run library(YOURPACKAGE).
Why might you do this? Personally, I think it is a nice way to put certain details such as where to find out more resources about the package, or report bugs. Some developers also use this space to include a few lines to advertise some of their other work. In tidyquant, you get a subtle start-up message when you load the package:
== Need to Learn tidyquant? =====================================================
Business Science offers a 1-hour course - Learning Lab #9: Performance Analysis & Portfolio Optimization with tidyquant!
</> Learn more at: https://university.business-science.io/p/learning-labs-pro </>
How do you add a start-up message? This can be done adding a function .onAttach() to one of your R scripts in the package. Here’s one I’ve created earlier for the wpa package:
.onAttach <- function(libname, pkgname) {
  message <- c("\n Thank you for using the {wpa} R package!",
               "\n \n Our analysts have taken every care to ensure that this package runs smoothly and bug-free.",
               "\n However, if you do happen to encounter any, please email mac@microsoft.com to report any issues.",
               "\n \n Happy coding!")
  packageStartupMessage(message)
}
The reason why this is controversial is because some argue that package start-up messages clutter up the console and interfere with reproducibility. 2 However, there is also another line of argument that defends the right of open-source developers to place adverts in the packages that they’ve worked so hard on (see this Twitter thread). Of course, you might just want to add a welcome message rather than an advert to your package, but I’ll leave this to the reader to decide.
6. Add a GIF in your README
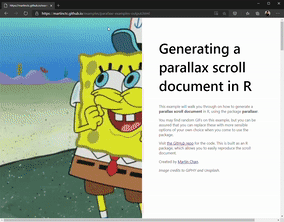
GIFs are awesome, even in the context of R package READMEs. I’ve recently experimented with screen-recording an example of my package in action, converting the video into a GIF, and adding it to the README - receiving mostly positive feedback. See the below example from the parallaxr package:
If your package allows you to generate visual outputs like plots or HTML widgets, this is a great way to let potential users see what they can achieve without leaving it only to their imagination (“what happens when I run foo_bar()?”).
7. Add a Contributor Guide and PR templates
This tip is actually what GitHub recommends under its settings in Insights > Community. And there are good reasons for doing so. The recommendation is that you should add a contributor guideline (CONTRIBUTING.md) and pull request template to your repository so that it makes it easier for others to collaborate on your package.
I would highly recommend doing anything that would make it easier for others to contribute, as I think it’s fair to say that the number of contributions (in the form of submitted issues, forks, and pull requests) is a mark of an R package’s success (you can measure using GitHub Stars too if you want, I guess).
GitHub has a comprehensive guide on how to add a Contributor Guide, and it’s really up to you to decide on how you would like others to contribute changes to your package. Still not sure what to put on your CONTRIBUTING.md? The best places to look are the big, popular R package GitHub repositories, and look at what they put in theirs (probably one of the most important takeaways of this post).
To add a pull request template, you’ll need to add a file named pull_request_template.md in the .github subfolder of your package. Certain things you may consider adding to your pull request template are:
- Summary of changes from the branch
- Checks to perform when reviewing the pull request
- What issues are linked to this pull request
You can use this version originally put together by Avision Ho as a starting point for authoring your own templates.
8. Add a hex sticker
There’s no way an R package is complete without a hex sticker. It’s tradition, it’s cool, although arguably not essential - but why not? It’s very easy to add one, and it makes people want to download your package first even when they haven’t quite figured out the use case for your code yet.

What’s more, you can create an R package hex sticker with an R package! If you’ve not heard of it yet, you should give GuangchuangYu’s hexSticker a go.
Alternatively, if you’re some what visual artist yourself, you can also choose to create one on your own with Inkscape, which is an open-source vector graphic editing software. Choose an existing hex sticker as a template, and edit the underlying SVG.
I would recommend editing with SVG because it preserves resolution, which may come into handy one day if your R package makes it big and people want to print it on merch. Dreaming on…
9. Create a package cheatsheet
Although I’m not aware if there are any R packages out there (tell me if you do) that can generate a package cheatsheet for you, it’s one of the things that are totally worth doing even manually.

A cheatsheet helps users view at a glance all the functions that are available in your package, and categorised in a meaningful way as you yourself (the developer) would have done it. The RStudio cheatsheet collection provides plenty of examples that you can reference, as well as a template for which you can create your own cheatsheet using either Keynote or PowerPoint. Here’s one I made earlier.
10. Submit to CRAN
Okay, this is kind of a no-brainer, and everyone ideally would want to have their package to be submitted to CRAN. It really is something you should try to do, even if it is a bit of work getting all the bits right, as it gives your package a mark of approval and boosted popularity.
Having automated R CMD checks will help you get there slightly faster and easier, and to be honest I did not find the process as difficult as I previously imagined. All the CRAN reviewers (who are volunteers, by the way!) have all been very helpful and explicit in their feedback on what needs to be changed in order to re-submit a package. Having said that, it’s courtesy to make sure you test and review your package thoroughly before submitting your packages to CRAN so you don’t waste time for both the CRAN team and yourself! Submitting to CRAN is a substantial topic in itself, so I’m going to just put down some links.
Karl Broman has a pretty informative primer on how to get your R package on CRAN.
Bonus tip…
Since the last tip was probably slightly less informative, I’ve decided to throw in a bonus tip, which is a list of channels in which you should try to promote your R package:
-
Write a blog about your package, and submit to R-bloggers. There is a huge readership / following with R-bloggers, and this is a great way of getting the R community aware of your package.
-
Submit your package to RWeekly, either as a blog or as a simple package release message. You can submit to RWeekly by creating a pull request to merge to its
DRAFT.md, or use one of the other submission methods listed on the website. -
Post your package release message on Twitter with the #rstats hashtag. This makes it much more likely for the package to be picked up by the R community. Note that the convention is to use #Rstats rather than #R as a hashtag - see https://www.t4rstats.com/hashtags-what-are-they-good-for.html.
I declare #rstats the official R statistical prog lang hashtag, pass it on to friends, family and Stata users
— Drew Conway (@drewconway) April 3, 2009
- If you use Reddit, consider posting in the Rstats subreddit.
Finally, it’s worth emphasising that the best way to learn how to improve your package is to look at how others do it. In the process of writing this post. I’ve learnt something myself when looking at the sjmisc package GitHub repository, i.e. a way to make it easy for others to cite your R package, with:
citation('data.table')
I’m sure there are plenty of other great tips out there that I’ve not included, but again I hope this post was useful enough. If you enjoyed this post, please comment in the original blog link. Take care and stay safe, and happy coding!